Viewing entries tagged
film photography

11 Comments

10 Reasons Why You Should Start Shooting FILM

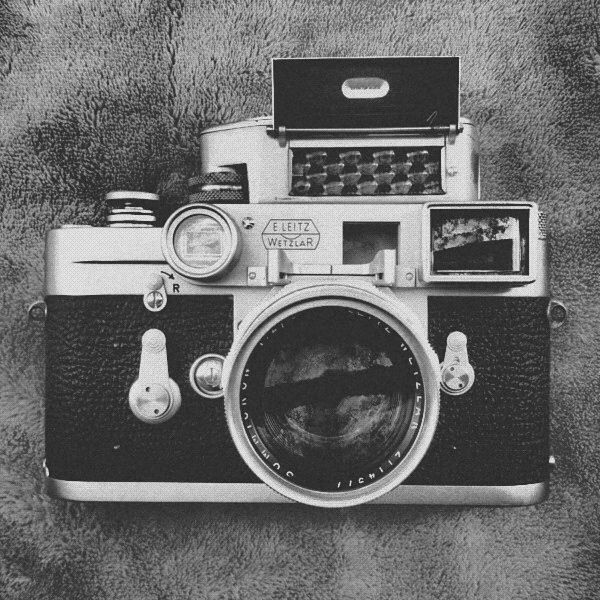
Leica M3

Here I would like to share my personal views about film photography. Below are the summary :

1) Film cameras last a really really long time ! A decent full mechanical camera such as a Nikon FM2 or a Leica M2 / M3 can easily last you a life time without having the need to upgrade. I love buying and collecting full mechanical cameras as they are the most reliable camera ever built. Having no ic chips , circuit board, built in light meter or motor drives, these camera are built to last. Just like your Rolex watches. With a good CLA ( clean, lubricate, and adjustment ) service done by a trained repairman, a 50 year old camera will eventually work like new again and will last you probably another 50 more years.

2) Explore different formats other than full frame.  Shooting anything larger than the 35mm format on digital is might cost you and arm or a leg. A decent medium format with a digital back might set you back around RM40 grand at least. There are tons of other larger formats film camera’s such as 6 X 4.5 , 6 x 6 , 6 X 7 or even 6 X 9 which produces amazing image quality at rather affordable price. Cameras such as the Yashica Mat, Pentacon 6, Mamiya and Kiev88 will probably cost as low as a point and shoot camera. Larger negatives = more details, bokeh and tonal gradation !

3) Skin tone and colors ! Good films such as the Fuji Pro 400H and the Kodak Portra produces amazing skin tones. It’s the most life like color I’ve ever seen from a camera. Every type of films has it’s own unique characteristics. As most photoshop action now days try to mimic film colors and character digitally, why not just use the real deal.

4) Shooting film makes you a better photographer. I have been shooting digitally for the past 6 years and only started film photography 2.5 yrs back. I have never learned so much about photography just until recently. It perfected my exposure and composition, and of course my attitude as a photographer. I have learned to be more patient, visualize my shots before snapping away, understanding DOF / zone focusing and of course the good ol’ Sunny 16 rules, which is to meter without using a light meter ! How cool is that ?

5) A good film camera appreciate in price while digital depreciates horribly . Leica aside, a Contax 645 cost as much as RM 5000 around 4-5 years back are now fetching close to 9k price tag just recently. I can still recall buying my Nikon D300 when it first launched at the price of RM 5.7k, while I sold it 2.5 years later for RM 2k.

6) It’s FUN ! I love street and wedding photography and carrying a vintage film camera around is easy to strike a conversation with strangers. I always get approached by uncles and aunties who is intrigue by those cameras from their era. After a short chat, it’s easy to get a shot of them : ) From experience, the more retro the camera is the easier it is to strike a conversation. There was one time I was shooting with a big ass Polaroid 600se in a coffee shop, the owner approached out of curiosity and asked me if I could take a picture of him with his lovely grandson. I was smiling ear to ear that a stranger would want his picture taken without me asking. After the shot, I was rewarded with two glasses of ice coffee for free ..

7) Film is making a come back ! Despite we see many good films are being taken off the market but I am sure there will be some to stay. Ilford have not discontinued any of their films for the past couple of years and highly sought after film such as the all time favorite Fuji Pro400H, Portra and Kodak TriX are unlikely to be dead as there are demands for it. Hence don't worry !

8) Learn to work on your photos in the darkroom ...not with the lightroom : ) I would say it's a total new experience. It's a lot more fun and seeing your images appear on the prints slowly and gradually is extremely rewarding and satisfying.

9) It's cheaper to shoot film in long run. Many consider shooting film is a luxury due to the high cost in buying and developing these film. It's actually not. A decent digital camera with lens would set you back around RM5k or so. You would need a computer to work on the files as well as additional storage space such as HDD / Cloud / NAS for backing up your photos. You might ended up shooting a thousand shots in RAW format for an outing or trip which probably only 100 of it are keepers while the remaining 900 stored away and never be seen coz they are too crappy to show When all these adds up ...it's actually costing a lot more. On a trip, I only bring 10 rolls of films which is probably around 36 x 10 = 360 shots but I ended up liking all 300 shots which I have taken. If you do the development on your own, it would be even more cost effective. All negatives can be stored in an organized folder or even in a shoe box as long it's keep in a cool dry place.

10. Enjoy easy and simply work flow once again ! How many of you always often spend countless hours in front of your computer trying to edit your last back of vacation photos which you have shot probably thousands of it but only ended up with just 100 or so keepers ? You will find shooting film is so so simple, there is nothing much you need to do besides archiving your negatives in a near and easy to find manner.


Still not convinced ? Feel free to check out our FILM GALLERY here !

11 Comments

4 Comments

8 Tips to Get You Started with Film Photography

MKP_3676.jpg

Planning to take up film photography but not sure where to start ? Here are a few pointers to help you out :

1. Get yourself a camera. A film camera is relatively easy to find. Just ask your dad, uncle, grandma, old friends and relatives and high chances that they might have one for your for free. If luck is not on your side, there is always ebay or and some local online stores such as Film Photography Buy/Sell Community (Malaysia) on Facebook. Not sure which camera to start with , just check out my old blog post on "Which Film Camera to BUY for beginners ?"

2. Give the camera a good check up ! High chances that the film camera which was left lying for years are no longer in optimum operating condition. If it’s purchased off ebay, do check with the seller on the condition. Mint +,  Mint - and Excellent are general term seller use describe their camera condition, so don’t be deceived. A mediocre condition will be graded as good with that sort of grading system. Best to do more research about the camera before investing, even more so on cameras with automation as repair would be really costly or high possibility that there is no more parts available.

Some of the frequent problems which plague mechanical film cameras are deteriorating light seals and mirror bumper, sluggish or inaccurate shutter speed, fungus on lenses and camera viewfinder, inaccurate or dead light meter and corroded battery compartment due to battery leakage. While for Twin Lens Reflex ( TLR ) and Rangefinder cameras, the focus calibration is most crucial. To check, just focus on a very far object like a high rise building and make sure it alligned properly at infinity. If it's not most likely the camera needs to be calibrated.  Most of the above could easily be addressed with a simple CLA  (clean, lubricate and adjustment ) from any trained camera technician for about RM150 or so depending on the condition. If the above are all good, I will normally exercise the shutter around 30 over times on all shutter speed to loosen up the camera gearing and lubrication.

3. Experiments with different films ! There are a few varieties of films out there. Basically you just need to know the format size ( 35mm and 120mm which is the most commonly used ) , ISO and film type ( color negative, slides and black and white ). Always check your camera format before buying.

For starting out, Fuji Superia and Agfa Vista are pretty good for the price. You can easily get your films at my regular photo lab ColorDotCom Digital Photo Lab, Bang Bang Geng or any available online store like ebay and etc. It’s a good beginner film to play with without burning a hole in your pocket. More professional grade films color negative films such as the the Kodak Portra and my all time fav Fuji Pro400H and Kodak Extar cost around RM 20 over per box. For black and white, I use mainly Kodak TriX400 which is my all time favorite and I prefer to do the developing on my own for the extra added contrast. In my humble opinion, that's the most versatile film ever. You could push it 3 stops and still perform reasonably well.

4. LOAD the film into the camera. PLEASE be EXTRA CAREFUL when loading film into any SLR or rangefinder type camera which looks something like this image below. The MOST FRAGILE part of the camera is this shutter curtain. It's actually just a thin layer of metal or cloth like material which controls by the shutter speed dial. When you are loading the film into the camera, do ENSURE your fingers stay off this middle section and don't ever apply any pressure on it else the shutter shutter will bent or break. It happens to me once on my FM2 and it cost around RM300 for a shutter replacement, ouch !

Once the film are loaded into the camera, do ensure the film winder turns ( top left as per photo below as an example ) as you cock the shutter. If it's not turning, most likely the film is not loaded properly. You can always counter double check by turning the film winder to feel if there is any tension on the winder.

5. REMOVE that roll with the upmost care ! This is the most common screw up of all time :) You wouldn't want your hard work and masterpiece gone wasted, if you are not sure read the camera user manual before operating. Trial and error doesn't work all the time ! All film camera user manual can be downloaded from this website and of course a small donation to them would do great considering the effort being taken to digitize all those manuals.

http://www.butkus.org/chinon/

In general, just press the film release button once you are done shooting( film couldn't advance anymore ) and rewind the film as per the direction of the arrow. Keep turning until you feel no more tension on the winder, this may take around 20 to 30 turns in total.

6. Developing and scanning would be the last step. In my opinion, there are two reputable photo lab in Kuala Lumpur that does developing, one being Color Dot Com in Uptown Damansara in which I am currently using and also Bang Bang Geng in Publika. Both of them are pretty good and I am happy with the out come so far. All scanned images will be supplied in jpeg format burnt into a CD or can be transferred online. Hence it's pretty easy

7. Practice makes perfect . Don't be despair if your first few rolls doesn't turn out as nice as you wanted it to be. It takes countless rolls of film and time to master. I have burnt through many rolls of film to finally figure out the characteristic of each film.

8. Don't be overly ambitions. Stick with one film for a certainly period of time before switching. Each film has different characteristic and exposure latitude ( in digital term they call is dynamic range : ) Hence constant switching you get you more confused and it's hard for your to actually know the film well enough.

4 Comments

Which Film Camera to buy for beginners ?

2 Comments

Which Film Camera to buy for beginners ?

So many film cameras in the market, which one should you buy ? Here are some tips for those who is starting out :

1. Keep it simple - The simpler film camera is , the less likely the camera will fail. Even if it fails, it would be easier and cheaper to repair. One have to consider the age of these film cameras could be as old as your parents A Leica M3 would probably be around 65 years old by now. I would suggest to get a camera with full mechanical function which does not rely on battery to operate.

2. Work within your budget - There is a huge range of film cameras in the market and their price varies from USD 40 all the way to USD 40k depending on the brand , rarity and condition. The Nikon FM or FE2 , Canon Canonet, Olympus 35SP, Yashica 124G, Minolta Autocord and Asahi Pentax are pretty affordable for newbies.

3. Type of cameras, Rangefinder or SLR - This depends on your shooting style. I would suggest rangefinder style camera if you love to shoot streets, travel and journalistic as rangefinder is more suited for the wide to mid range zoom lenses. The size is compact , less obtrusive and usually very light. Go for SLR if you love doing portrait , macro, sports or wildlife. What about TLRs you may asked ...well I wouldn't recommend it as your first camera as the number of shots per roll is a lot less as it is a medium format camera. You will only get 12 exposures for roll of film hence make your learning curve a lot more expensive.

3. Keep it small - There is a saying ' The best camera is the one with you ! '. I would suggest to start out with a camera which is small and portable so you would use it more. We understand that huge and bulky cameras such as the Hasselblad  500cm and Mamiya RZ67 looks uber cool but it require quite a bit of muscle to lug it around. It certainly not an everyday camera for you to learn. First the number of exposures are greatly reduced ( the Hassie 500cm only clocks 12 shots ) , the processing fee is pretty much the same hence the cost per shot is a lot higher !

4. Availability of film format and place to process the negatives - Through out the years many film format has already been discontinued. Hence if you found a camera with the below format kindly avoid them at all cost unless it plan to keep the camera as a paper weight or a display item - 220 ( discontinued ) , large format 4 x 5 and 8 x 10

5. BATTERY type - Many of the older film cameras out there uses mercury battery which is no longer in production. Always check if there is a replacement / substitute battery which you could use. If not it would be pointless to own a camera which you can't operate unless you are a camera collector.


2 Comments

Leica M3 Review

2 Comments

Leica M3 Review

MKP_3669cv.jpg
MKP_3674.jpg

The Leica M3 is one amazing camera and I absolutely love it to the max. I had this camera for almost 5 years after I bought my Leica M2. I have always loved the design and built  of the film Leica cameras particularly those made in the  early 50’s till early 70’s.The built quality and use of materials are impeccable which explains why it still look pretty darn good after 50 over years. The finish is flawless even till today and it has the smoothest film advance I have ever come upon on a film camera. It feels like it’s running on a layer of butter !

The M3 is the first M series ever produced by Leica in Solms, Germany back in 1954. Equipped with a bright 0.92x viewfinder, 3 frames lines ( 50, 90 and 135 ), a self timer and 1/1000th sec shutter speed is all the features there is in this camera. Pure simplicity and only the essentials. What I love most about this camera ( besides it’s look ) is the viewfinder. It has the clearest and highest magnification viewfinder among all the M series and best of all it’s flare resistant ! The newer M6 classic, M6 TTL and M7 are prone to flare which makes focusing really difficult when shooting against strong lights. Only the recent Leica MP has flare proof RF like the M3. As I love shooting against back light , this is a truly a blessing. 

The 50mm frame is permanently visible, with broad white lines and rounded corners.
The 90 and 135mm frames pop up when the corresponding lens is inserted. Very clever and first in it's class back in that era. 
If there is a need to use 35mm or wider lenses, the M3 with its basically 50mm viewfinder is handicapped and it’s almost impossible to guess the exact frame lines. The only way would be to use the Leica 35mm with auxiliary reducing goggles or an additional 35mm view finder attached to the camera hot shoe. Easy fix indeed.  

There are many variants of M3 in the market due to it's long production life , hence the serial number is the easiest way to gauge which version you are having. Older M3’s adopted the continental shutter speeds (1/25, 1/50, 1/100, 1/250) and later ones the international range (1/30, 1/60 etc.). The first version of the M3 has a smaller viewfinder frame , require double stroke to wind film ( cock twice instead of one time ) and lower ISO / ASA range on the indicator. Later models have subtle upgrades on all these parts. 

Film loading on the M3 is slightly conventional where one needs to remove the spool from the camera. It is indeed a little slower then the M6 quick load style but at least it is the most reliable and fool proof loading method. There are a few times where the film leader wasn’t securely fasten to the take up spool chamber on the M6. I know this is more like a user problem …but the M3 loading method does not have such room for errors. I heard that the quick load kit work wonders by converting the M3 conventional style to more modern M6 style but I was told that the film counter will not reset itself. I can live with it hence not a biggie for me.

I use this camera mainly for black and white photos. I love pairing it with the 50mm f2 dual range Summicron or the 5cm f2 collapsible cron with yellow filters for that classic black and white look. For metering, I’ll either use the sunny 16 rules when I’m outdoor or my trusty light meter apps on my iphone for more tricky lighting condition. Works great for so far and really enjoy using this camera a lot and I am a big fan of 50mm lenses. 

If you ever plan to get one , I would suggest hunt around for a serial number above 950,000 as most likely will have one with all the subtle upgrades implemented. Do check the rangefinder mirror too for signs of desilvering as repair would be costly. Comparing to the M2 , M5 , M6 classic , M6 ttl which I have, the M3 is still one of my all time favourite . 

2 Comments

1 Comment

Hasselblad 500cm / 503cx Tips and Review

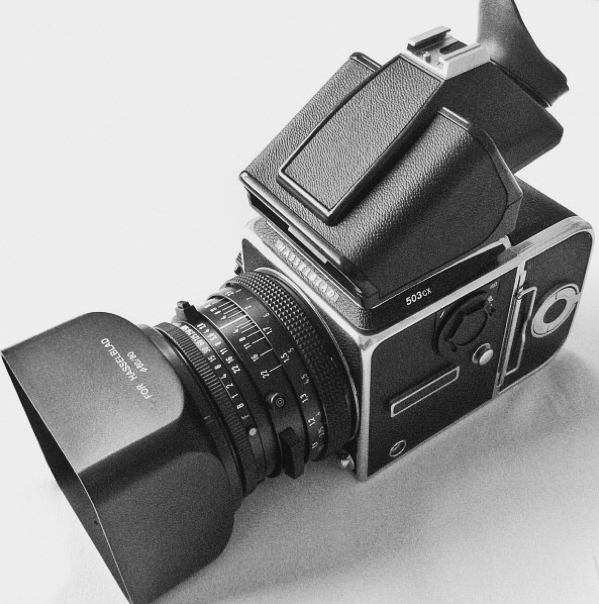
Hasselblad 503cx

As a photographer, I have always been curious to know how does it feels  to actually hold and shoot the world’s first camera which travels to the moon. The brand Hasselblad or Hassie in short has been synonym with amazing picture quality and workmanship as well as high flexibility. I can still remember the day clearly when I first collected the camera from the KLIA custom ( i got it off ebay ) . Opening up the parcel with utmost care and assembling the camera part by part while in the car until it finally take shape is truly hard to forget.


The 500cm as well as the rest of the Hassie are modular system cameras which allows user to mix and match the components whichever suits their needs. In other words, the photographer have the flexibility to choose different bodies, film or digital backs or even Polaroid back,  waist level or prism finder, focus screen as well as manual or motorized winders as per one’s preference / needs. I have both the 500cm as well as 503cx and they are almost identical. The only difference between these two siblings is the 500cm the more down to earth brother while the 503cx come with palpas internal coating at shutter curtain and mirror chamber which supposed to have a slightly better light absorption. The 503cx has the ability to do center-weight TTL Flash metering with appropriate SCA modules with certain capable flashes. Hence the 503cx has an ISO dial on the left side of the body as shown on the image on top. I use the 500cm more for natural light / out door shoots while the 503cx more for studio application as well as a back up. Both or can I say all the film Hassei runs on 120 / 220 film and it shoot 6x6 format which is Square ...think Instagram ! : )

I have replaced the original split focusing screens on these two Hassie with a high brightness Accumate screen which works really awesome. The clarity and brightness improved tremendously. I have also purchased a metered prim finder to go with it. I would highly recommend these two combination though the upgrade is not cheap. Prob will set you back around USD 350 for one set.

Starting with the body, the built quality and material used is indeed top notch. This Swedish made camera is cast out from an aluminum alloy body which is indeed very solid. The Carl Zeiss Planar 80mm f2.8 CF T* is one of the fastest lens in the Hassie line up. It’s small and light weight despite it’s metal construction. The focal length is almost equivalent to a 50mm lens on a full frame camera hence it's very useable. The CF*T lenses is the second generation Planar and it comes with Zeiss T* coating which helps with flare reduction. What I love most about this lens is the creamy bokeh as well as the amazing color reproduction. It’s to die for ! The sharpness is good even wide open. Being a medium format, the subject on the image just pops right out of the negatives / scans. I am starting to understand why Rolleiflex 2.8F , Rolleiflex SL66 as well as the legendary Contax 645 ( f2 version ) uses the 80 Planar lens. All the Hassies lens have a locking EV value on the aperture ring and shutter speed ring hence changing depth-of-view ( F stop ) while maintaining the same exposure during middle of a shoot is really a breeze.

In term of useability, the camera is pretty light for a medium format and it's so easy to size it down when you are traveling. Just replace the metered prism finder back with it's original waist level finder that would save you around 160gs easily. The Hassie fits perfectly into a Billingham Hadley Pro with two additional film backs being stored on the front pouches. Just awesome !

For first timer, using the Hassie is not an easy task. There are a lot of steps involved and the most crucial is to fully wound / cock  the shutter before you remove the lens or film back. There is a coupling system between the camera body and the lens right at 6 o'clock of the lens mount. It needs to be aligned accordingly ( in the horizontal position ) in order to mount the lens correctly without damaging the camera.

If the lens is removed when the shutter is not cocked, the cam on the lens will spring to the vertical position. You would have to use a small screw driver to turn the cam clock wise as per the arrow indication until the slot is aligned with the red dot on the left as per below diagram. Only then you can mount the lens back to the camera body.

On the right side of the camera body, there are also two indicator who show the status of the shutter, RED = Uncocked  WHITE = Cocked. Both indicator on the body as well as the film back needs to match as well in order to mount. Hence as a general rule of thumb, make it a habit to  cock the shutter all the time right after you fire a shot and you should be pretty much save from damaging the camera. Don't ever remove the lens when the shutter is not cocked else you will risk damaging the camera !

photo 2(4).JPG

Pros : It's modular and very versatile. Very well built and the Zeiss  80mm f2.8 CF optics is amazing even shot wide open. I absolutely love this glass !  I love the replacement accumatte focusing screen too. It's among the brightest in the market which makes focusing such a breeze.

Cons : The body and lens coupling can be a little tricky for new user . Make sure you spend time to read the user manual thoroughly before using it . It's also not cheap.

Buying tips : The price for the 500cm has been escalating quite a fair bit for the past two years specially with the Zeiss 80mm f2.8 CF*T lens.  I foresee this particular model will appreciate it price and become more collectible as it is really well made and a true classic. As the Hassie body is really simple in construction ( which basically is just a small mirror box ), it's pretty much problem free.


Click here for SAMPLE IMAGES


1 Comment