Viewing entries tagged
camera review

Leica M3 Review

2 Comments

Leica M3 Review

MKP_3669cv.jpg
MKP_3674.jpg

The Leica M3 is one amazing camera and I absolutely love it to the max. I had this camera for almost 5 years after I bought my Leica M2. I have always loved the design and built  of the film Leica cameras particularly those made in the  early 50’s till early 70’s.The built quality and use of materials are impeccable which explains why it still look pretty darn good after 50 over years. The finish is flawless even till today and it has the smoothest film advance I have ever come upon on a film camera. It feels like it’s running on a layer of butter !

The M3 is the first M series ever produced by Leica in Solms, Germany back in 1954. Equipped with a bright 0.92x viewfinder, 3 frames lines ( 50, 90 and 135 ), a self timer and 1/1000th sec shutter speed is all the features there is in this camera. Pure simplicity and only the essentials. What I love most about this camera ( besides it’s look ) is the viewfinder. It has the clearest and highest magnification viewfinder among all the M series and best of all it’s flare resistant ! The newer M6 classic, M6 TTL and M7 are prone to flare which makes focusing really difficult when shooting against strong lights. Only the recent Leica MP has flare proof RF like the M3. As I love shooting against back light , this is a truly a blessing. 

The 50mm frame is permanently visible, with broad white lines and rounded corners.
The 90 and 135mm frames pop up when the corresponding lens is inserted. Very clever and first in it's class back in that era. 
If there is a need to use 35mm or wider lenses, the M3 with its basically 50mm viewfinder is handicapped and it’s almost impossible to guess the exact frame lines. The only way would be to use the Leica 35mm with auxiliary reducing goggles or an additional 35mm view finder attached to the camera hot shoe. Easy fix indeed.  

There are many variants of M3 in the market due to it's long production life , hence the serial number is the easiest way to gauge which version you are having. Older M3’s adopted the continental shutter speeds (1/25, 1/50, 1/100, 1/250) and later ones the international range (1/30, 1/60 etc.). The first version of the M3 has a smaller viewfinder frame , require double stroke to wind film ( cock twice instead of one time ) and lower ISO / ASA range on the indicator. Later models have subtle upgrades on all these parts. 

Film loading on the M3 is slightly conventional where one needs to remove the spool from the camera. It is indeed a little slower then the M6 quick load style but at least it is the most reliable and fool proof loading method. There are a few times where the film leader wasn’t securely fasten to the take up spool chamber on the M6. I know this is more like a user problem …but the M3 loading method does not have such room for errors. I heard that the quick load kit work wonders by converting the M3 conventional style to more modern M6 style but I was told that the film counter will not reset itself. I can live with it hence not a biggie for me.

I use this camera mainly for black and white photos. I love pairing it with the 50mm f2 dual range Summicron or the 5cm f2 collapsible cron with yellow filters for that classic black and white look. For metering, I’ll either use the sunny 16 rules when I’m outdoor or my trusty light meter apps on my iphone for more tricky lighting condition. Works great for so far and really enjoy using this camera a lot and I am a big fan of 50mm lenses. 

If you ever plan to get one , I would suggest hunt around for a serial number above 950,000 as most likely will have one with all the subtle upgrades implemented. Do check the rangefinder mirror too for signs of desilvering as repair would be costly. Comparing to the M2 , M5 , M6 classic , M6 ttl which I have, the M3 is still one of my all time favourite . 

2 Comments

1 Comment

Hasselblad 500cm / 503cx Tips and Review

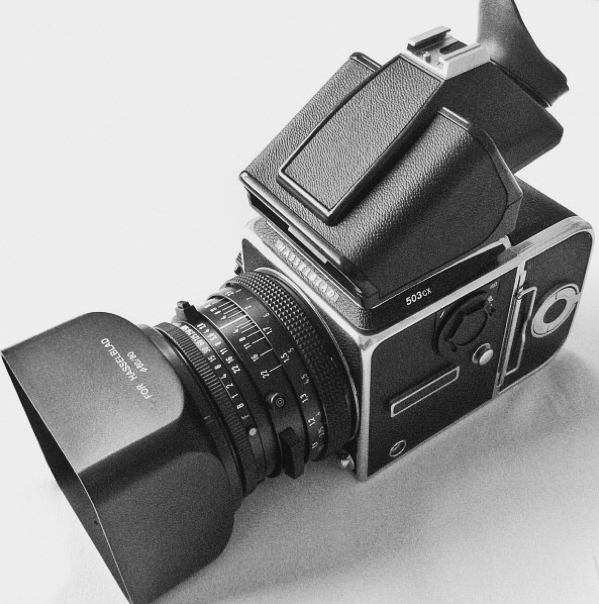
Hasselblad 503cx

As a photographer, I have always been curious to know how does it feels  to actually hold and shoot the world’s first camera which travels to the moon. The brand Hasselblad or Hassie in short has been synonym with amazing picture quality and workmanship as well as high flexibility. I can still remember the day clearly when I first collected the camera from the KLIA custom ( i got it off ebay ) . Opening up the parcel with utmost care and assembling the camera part by part while in the car until it finally take shape is truly hard to forget.


The 500cm as well as the rest of the Hassie are modular system cameras which allows user to mix and match the components whichever suits their needs. In other words, the photographer have the flexibility to choose different bodies, film or digital backs or even Polaroid back,  waist level or prism finder, focus screen as well as manual or motorized winders as per one’s preference / needs. I have both the 500cm as well as 503cx and they are almost identical. The only difference between these two siblings is the 500cm the more down to earth brother while the 503cx come with palpas internal coating at shutter curtain and mirror chamber which supposed to have a slightly better light absorption. The 503cx has the ability to do center-weight TTL Flash metering with appropriate SCA modules with certain capable flashes. Hence the 503cx has an ISO dial on the left side of the body as shown on the image on top. I use the 500cm more for natural light / out door shoots while the 503cx more for studio application as well as a back up. Both or can I say all the film Hassei runs on 120 / 220 film and it shoot 6x6 format which is Square ...think Instagram ! : )

I have replaced the original split focusing screens on these two Hassie with a high brightness Accumate screen which works really awesome. The clarity and brightness improved tremendously. I have also purchased a metered prim finder to go with it. I would highly recommend these two combination though the upgrade is not cheap. Prob will set you back around USD 350 for one set.

Starting with the body, the built quality and material used is indeed top notch. This Swedish made camera is cast out from an aluminum alloy body which is indeed very solid. The Carl Zeiss Planar 80mm f2.8 CF T* is one of the fastest lens in the Hassie line up. It’s small and light weight despite it’s metal construction. The focal length is almost equivalent to a 50mm lens on a full frame camera hence it's very useable. The CF*T lenses is the second generation Planar and it comes with Zeiss T* coating which helps with flare reduction. What I love most about this lens is the creamy bokeh as well as the amazing color reproduction. It’s to die for ! The sharpness is good even wide open. Being a medium format, the subject on the image just pops right out of the negatives / scans. I am starting to understand why Rolleiflex 2.8F , Rolleiflex SL66 as well as the legendary Contax 645 ( f2 version ) uses the 80 Planar lens. All the Hassies lens have a locking EV value on the aperture ring and shutter speed ring hence changing depth-of-view ( F stop ) while maintaining the same exposure during middle of a shoot is really a breeze.

In term of useability, the camera is pretty light for a medium format and it's so easy to size it down when you are traveling. Just replace the metered prism finder back with it's original waist level finder that would save you around 160gs easily. The Hassie fits perfectly into a Billingham Hadley Pro with two additional film backs being stored on the front pouches. Just awesome !

For first timer, using the Hassie is not an easy task. There are a lot of steps involved and the most crucial is to fully wound / cock  the shutter before you remove the lens or film back. There is a coupling system between the camera body and the lens right at 6 o'clock of the lens mount. It needs to be aligned accordingly ( in the horizontal position ) in order to mount the lens correctly without damaging the camera.

If the lens is removed when the shutter is not cocked, the cam on the lens will spring to the vertical position. You would have to use a small screw driver to turn the cam clock wise as per the arrow indication until the slot is aligned with the red dot on the left as per below diagram. Only then you can mount the lens back to the camera body.

On the right side of the camera body, there are also two indicator who show the status of the shutter, RED = Uncocked  WHITE = Cocked. Both indicator on the body as well as the film back needs to match as well in order to mount. Hence as a general rule of thumb, make it a habit to  cock the shutter all the time right after you fire a shot and you should be pretty much save from damaging the camera. Don't ever remove the lens when the shutter is not cocked else you will risk damaging the camera !

photo 2(4).JPG

Pros : It's modular and very versatile. Very well built and the Zeiss  80mm f2.8 CF optics is amazing even shot wide open. I absolutely love this glass !  I love the replacement accumatte focusing screen too. It's among the brightest in the market which makes focusing such a breeze.

Cons : The body and lens coupling can be a little tricky for new user . Make sure you spend time to read the user manual thoroughly before using it . It's also not cheap.

Buying tips : The price for the 500cm has been escalating quite a fair bit for the past two years specially with the Zeiss 80mm f2.8 CF*T lens.  I foresee this particular model will appreciate it price and become more collectible as it is really well made and a true classic. As the Hassie body is really simple in construction ( which basically is just a small mirror box ), it's pretty much problem free.


Click here for SAMPLE IMAGES


1 Comment

2 Comments

Battle of the TLR : Minolta Autocord

1. Yashica 124G     2. Minolta Autocord     3. Rolleiflex T     4.Rolleilex 3.5F     5. Rolleiflex 2.8F   

1. Yashica 124G     2. Minolta Autocord     3. Rolleiflex T     4.Rolleilex 3.5F     5. Rolleiflex 2.8F   

I am a huge fan of rangefinder and TLR cameras and I am thankful to have these few awesome cams in my collection. I will be doing reviews on every single of it and share my thoughts and experience shooting with these beauties.


Minolta Autocord

Starting off with the humble Minolta Autocord, which one could purchase for around USD 250 to 370 or so for a decent used copy. Equipped with Minolta Chiyoka Rokkor  75mm f3.5 taking lens and Seikosha MX shutter, the camera is a great performer for it's price. The lens is the greatest asset of this camera. Though it was built sometime back in the 60's the image from the Rokkor lens on this camera looks rather modern and almost digital like specially with Pro400H and Pro160NS which I tested on. The image is slightly more vibrant and contrasty with great amount of details even when shot wide open. Sharpness is certainly not an issue for this lens be it at the center or corner. Very snappy with smooth out of focus bokeh.

In terms of operation, this camera is one of the odd one out as compared to the rest in the TLRs. The film is loaded on the opposite direction of all other TLR in the market in which the film roll is at the bottom while the spool is at the top. Hence if you have a Rolleiflex or a Yashica Mat, you might be confused with the loading at times.

Apart from that, the focus knob is located right below of the taking lens operating in a sweeping motion. The rest of the camera maker opted for the focus knob on the side of the camera body which I feel is more intuitive and ergonomic. Focusing the Autocord for the very first time do feel a bit awkward but after a couple of shots I am starting to feel at home with it. From what I gathered from the Minolta collectors forum, the sweeping focus allow one hand operation where the user could use the thumb and index finger to move the focus tab while using the ring finger to push the shutter release button. Thought this is indeed useful but the design and material used might not be the best. The main problem with this TLR is the focus tab being stiff after years of operation due to harding / drying of the lubrication used. This Left and right movement stresses the focus shaft which causes it to break over time. This is a known issue with this camera. Hence If you feel that your Autocord is having a stiff focus issue, kindly send it for CLA ( clean, lubricate, adjustment ) or some called it overhaul .

While as for the waist level finder, I wouldn't say it's the brightest but as compared to the rest of the TLR at this price range, it's a fair performer. Changing the focus screen would certainly help to ease out the focusing process but finding one with a decent price is certainly not easy.

Metering is non existence in this camera of this era hence an external light meter is recommended.


Summary

Pros : Amazing Minolta Chiyoka Rokkor 75mm f3.5 lens for this price range of TLR. Good contrast, great color rendition and not too prone to flare.

Cons : Camera focus tab is the achilles heels of this camera. Many units which I saw on sale have a broken focus tab ! The ergonomics of this camera can be a little quirky. Even thought Minolta claimed that this is the only TLR camera which you can focus with just one hand but the fact is ...why use one hand when you are blessed with two ?

Buying tips : All version of Autocord looks rather the same and the upgrades are very minute. Older version have no light meter while the later units have light meter. I would suggest to go for the non-light metered version as most of the light meters in the unit are either faulty or inaccurate by now. That would save your some money and weight as well. Always check the focus tab throughly to see if it's easy to focus or simply being THERE as the camera looks rather complete even the tab is missing! Just make sure you see a metallic round stud at the focusing scale area which looks like a smiley face : ) Should the focusing is not smooth or has a lot of friction, try to avoid it unless you are willing to pay for a CLA which might cost your around RM300.

My thoughts : I feel this is one of the best bang per bucks TLR camera out there in the used market.  The direct comparison for TLRs at this price range would be the Yashica Mat variants , more beat up condition Rolleicords and the China made Seagull or some called it Hai 'O. The lens is really nice, decent built quality and again make sure the focus tab works !

2 Comments

1 Comment

Olympus 35sp review

The 35sp was the only compact rangefinder to have a build in spot meter, hence giving it an edge over it’s rival such as the Yashica Electro, Canon Canonet, Monilta Hi-Matic and such. If you are not familiar with rangefinder cameras, click here on my past article 'What is Rangefinder Cameras ?'
The camera come equipped with a fixed 42mmf1.7 Olympus Zuiko lens. Being a prime lens, the optics are indeed very sharp. I truly enjoy the focal length as it is a good compromise between a 35mm ( street photography ) and 50mm (portrait lens). This camera utilizes the leaf shutter mechanism hence it’s possible to hand held at really low shutter speed ..say 1/15s.

On the streets
Using this camera is very fun. It’s basically “like” a point and shoot camera once you set it on A (automatic) mode. The camera is constantly on shutter priority mode when it’s on A . Don’t get mislead by A as Aperture priority like on all modern camera.  Hence the user selects the desired shutter speed, the camera will automatically determines the suitable aperture setting based on the light reading. I normally max out the shutter speed at 1/500s so the camera will be forced to use the min possible aperture setting.

The camera also allows manual operation but the operation is a little tedious. One would have to read the Ev value based on meter reading and set the Ev value manually on the lens for a perfect exposure. I personally find it slow hence more suited for photographing still life or landscape with this exposure method .

Another nice feature on this camera is the close range focus throw . Which mean with a slightly more than a quarter turn it bring the focus from closest to infinity. So with a little practice, shooting moving subject would not be that difficult.

This camera basically come in two version. The Olympus SP as shown here and the Olympus SPn which is basically an identical camera but with an additional battery check button. The SPn is a lot harder to find due to the low production quantity hence will normally fetch higher prices among collectors.


Summary

Pros : Good optics . Small and light which makes carrying it whole days is not a problem. Light meter is fairly accurate and rather spot. Really easy to use and good for everyday cam.

Cons : It's not cheap. A good copy might set you back around RM 1200.


1 Comment